January 25 – February 2, 2020
Happening in 3 physical locations as a collaborative effort at the same time, including an option for remote participation:
– Dallas, Texas (USA)
– Richmond, Virginia (USA)
– Ghent, Belgium (Europe)
Build Yourself. Build Your World.
Ever have an idea and not know what to do with it? Ever wish you could build something to solve a problem that no one else has solved? But you did not know where to start? Well, you are 9 days away from being able to do that. In our 9-day Open Source Microfactory STEAM Camp, you’ll learn how to build a 3D printer and other production machines, you will learn the basic principles of design, and you’ll be able to turn your ideas into prototypes, so you can turn your prototypes into a business. We will teach you the basic language of design spanning many fields – so you can apply these skills to shape the world that you would like to build. We will teach you about our Construction Set approach – with common libraries of parts – to make powerful design achievable with basic skills.
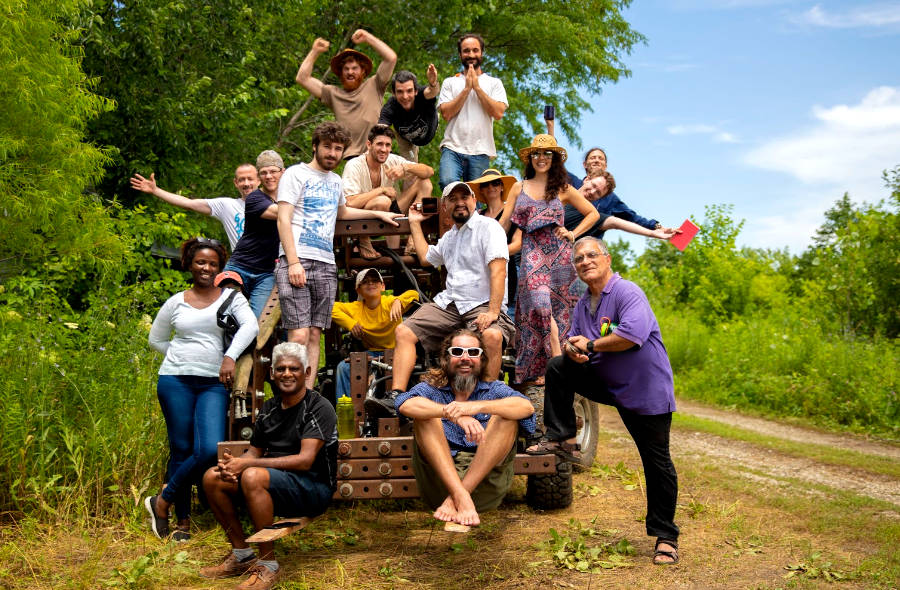
We focus on collaborative design – and this is our first ever event that is happening in 3 locations at the same time in Europe and America. The goal is to collaborate with the 3 groups so that rapid design and prototyping can take place – as a combined effort which accelerates innovation and creates a viable path to the open source economy.
Collaborative Design Training
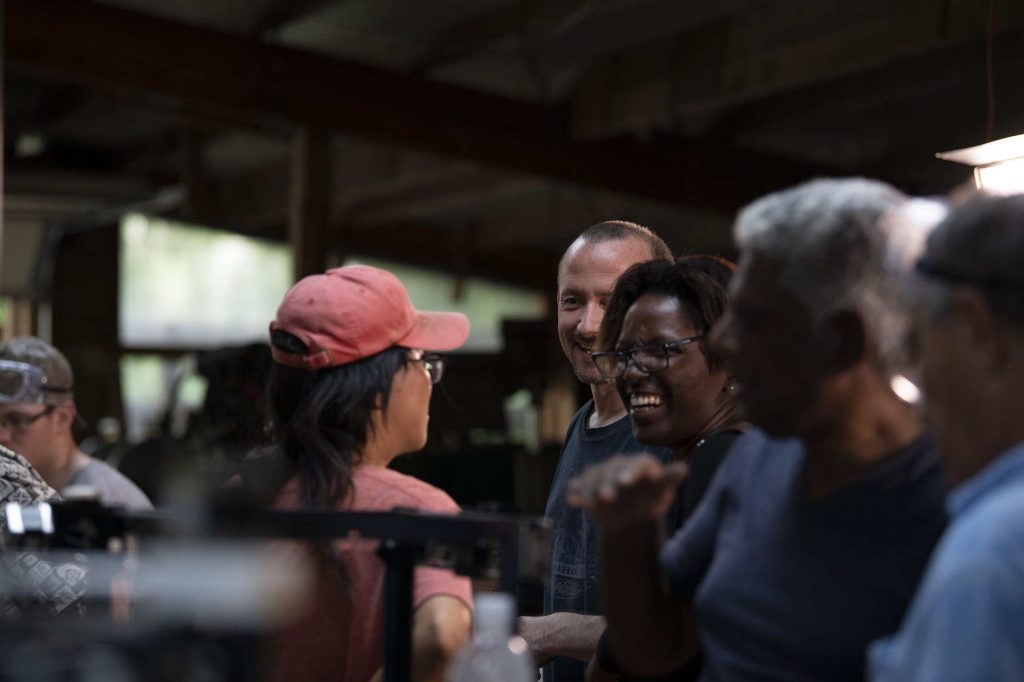
Open Source Ecology is about collaborative design for a transparent and inclusive economy of abundance. The Open Source Microfactory STEAM Camp will explore this mission with hands-on projects and swarm-builds. You will get a chance to build powerful tools that could be used in the real world – in time frames that you did not think were possible – by leveraging collaborative, open source design – across 2 continents and 3 locations.
The Open Source Microfactory STEAM Camp is a hands-on, immersion learning experience for designing and building useful, tangible products. Our goal is to shift the economy towards open source product design – and open source microfactories as the new engines of production.
Currently we are developing the Open Source Microfactory STEAM Camp as a regular, ongoing immersion education program to be deployed concurrently in multiple cities around the world. This is our first trilateral event. Based on the success of our first STEAM Camp, we felt that we can make a dent in the universe by offering collaborative design training for public development of common products – such that we truly democratize production and bring innovation back to every community. Thus has emerged the concept of the Open Source Everything Store – a truly open source and collaborative effort that builds upon the work of many people to produce real, useful products – that can be manufactured in local microfactories using 100% open source production machines. This is the open source Fab Lab or Open Source Microfactory – with the promise of doing for production what Wikipedia has done for knowledge.
People have alluded to this promise for over a decade since the publication of Fab by seminal thinkers in the field. But now, it’s time for the real deal. In the digital age, the obstacle is no longer technical – but cultural. What is missing is collaborative literacy – not hardware technology. We started the Open Source Microfactory STEAM Camp to fill the collaborative literacy gap: to produce a world of collaborative design for a transparent and inclusive economy of abundance.
The STEAM Camps intend to build a global team of capable open-sourcerers – capable of wielding fully open source hardware and software tools for unleashed innovation. To develop products on a predictable schedule, we are also beginning to use the Incentive Challenge format. On Sep 1, 2020 – we will launch a $250k challenge to produce the world’s first, 3D printed, professional grade cordless drill – from waste plastic – using 100% open source microfactory technology. Our goal is to show the first, noticeable, replicable example of market disruption with open source hardware – on the way towards open collaboration becoming the norm in enterprise. Simply put – this is about creating a world beyond scarcity – where as we learned in kindergarten – we begin to share.

As part of the STEAM Camp, each participant will receive a Developer Kit consisting of the following components. We will build all these parts into useful products or experiments, and these constitute a set of important building blocks for teaching, which can be extended into economic productivity. Participants each take their kit home with them.
- 3D Printer – D3D Universal 3D printer kit – with automated bed leveling, quick release spring steel print bed, Volcano nozzle for fast printing, and fast 1.2 mm stock printing nozzle. We include a spool of filament and a set of small tools required to put the printer together. Our printer is modular, highly expandable, and features the lowest part count of any 3D printer in the world. It is made for expandability and bootstrapping to industrial grade machines – yet it features a simple design made from common off-the-shelf parts – thus allowing a lifetime of service and the ability to grow the machine as your production needs grow. The 3D Printer includes an SD card of printing files to make the D3D Pro 3D Printer and the CNC Torch Table.
- Plotter Attachment Kit – a pen plotter attachment is included in the kit, which is mounted on D3D Universal as a separate, quick-attach toolhead for CNC plotting of pictures or for drawing circuits to be etched on copper-clad boards. The plotter attachments includes a pen.
- Milling Attachment Kit – the milling attachment kit includes a DC motor, coupler, and 1 mm milling bit, and quick-attach mount for mounting the motor to the D3D Universal CNC axis.
- Electronics Kit – This includes the parts necessary to build 2 Arduino Uno microcontrollers from scratch: components, strip board, copper clad board, soldering iron, copper chloride etchant, and a bath container for mounting on the D3D Universal bed for agitation. Combined with the Milling Attachment Kit, Battery and Welder Kit, and a KiCad lesson, this constitutes a rich lesson plan on circuit-making for practical purposes.
- Battery and Welder Kit – this includes all the parts necessary to build a battery pack from 18650 lithium ion cells, and a 3D printed welder Power Controller Board that can be powered by a stack of battery packs. Each kit contains 6 of the lithium ion cells, so we will combine multiple battery packs from several participants into a larger power pack to make a functional, 60-180 amp welder. We will build a simple welding electrode holder and 3D printed clamp – and we are ready for a welding lesson. The same Power Controller Board that we are using for the welder is a generalized Power Electronics Circuit can be modified to function as a light dimmer, DC motor power supply, and battery charger – and is controlled by the Arduino from the Electronics Kit.
- Raspberry Pi/Beagle Bone Tablet and Film Studio Kit – comes with a Raspberry Pi 4B, 7″ touch LCD, a 4K Camera Module v2 for video, and LED module as a warm camera or shop light. Kit includes connection wiring and a battery charger. Together with the battery packs of the Battery and Welder Kit, this is ready to be turned into a functional multipurpose tablet – with 3d printed tripod, camera stabilizer, light, and slider.
Overview
The STEAM Camp is a 9 day hands-on immersion that involves class time and build time. There are about 3 hours of class time per day, where we teach about collaborative design techniques, do design reviews, or other learning activities. There may be several invited presenters who will provide presentations from remote locations. Most of the time is spent with hands-on learning – whether using design and collaboration software tools – or doing hands-on builds. All learning takes place across multiple disciplines: science, technology, art, design, build, documentation, and most importantly – collaboration. The 9 days are divided into 4 days of collaborative design boot camp, and 5 Project Days. All of this is done collaborative, where in addition to the instructors doing their part in presenting material – we rely on participants teaching each other so that we create an immersion learning environment where everyone contributes.The event is built around increasing participants’ capacity to work collaboratively, by documenting and building upon each others’ work.
Moreover, this collaboration takes place globally. The STEAM Camp takes place in 3 locations – Belgium; Richmond,Virginia; and Dallas, Texas. So when you join, you are joining a larger collaborative effort. This effort does not stop at these 3 physical locations, as we also have a Remote Participation option, as we broadcast our content between the 3 locations and between Remote Participants, who may be located anywhere that a video connection can be found. The remote participants have access to the Developer’s Kit (see below) of tools and parts that everyone in the physical locations will be working with. As we broadcast the event live, Remote Participants have the chance do do all the builds alongside of us, and to participate hands-on in all the builds or experiments. Remote Participants can thus collaborate fully in uploading and downloading design, while engaging in rapid prototyping – to move the collaborative design effort forward in a significant way. Our goal is to leverage open design, fully open source toolchains, and open processes to involve as many people in our modular design. By breaking down projects into small parts or modules, we are able to involve a large team in effective, parallel development across the globe.
To collaborate – the practical side involves frequent and ongoing uploads and downloads of designs to the wiki, and each contributor maintains a Work Log to orient everyone else on their activity. By observing Recent Changes on the wiki, visual version histories, and by coordinating via video communication – we collaborate in a seamless and effective way. We have been pioneering such collaborative design for years in the world of open hardware, and will scale this to a much larger level in our forthcoming collaborative Incentive Challenge of September, 2020. The STEAM Camps are intended to provide skills for large-scale open design collaboration.
As an important addition to the collaborative mindset – we teach how working together can get more powerful results – both as a metaphor for the power of collaboration – and literally. For example, the battery pack that each person builds – with decent power by itself – can run the Raspberry Pi Tablet for 5 hours. But we demonstrate much greater power when we stack multiple battery packs together from all the participants – to make a cordless welder that can weld for one hour of time.
We are building continuity and community into the learning program as well. To prepare, students are encouraged to download our software suite, OSE Linux, to become familiar with the tools before participating in the live event. The learning experience continues after the Camp, where we invite all onsite + remote participants – as well as participants from former STEAM Camps – to additional follow-up sessions. These sessions are held on Saturdays – for 2-4 hour Design Sprints, where we follow up on design and documentation projects, or possibly even pivot to other collaborative design. Our intended outcome of the STEAM Camps is to provide the collaborative literacy that allows all of us to work together. We are especially interested in technology that matters. We do all this while building a community of early adopters of the forthcoming open source economy, where a new paradigm of collaborative design replaces competitive waste.
All work aims at the release of marketable products that can meet real needs. We offer the special value proposition of lifetime design – where users can maintain or upgrade each product based on its open source, easy-to-build design, which uses common-off-the-shelf (COTS) parts in addition to parts that may be fabricated digitally such as with the 3D printer. Our goal is to foster an entrepreneurial spirit, where people contribute to their local economies, while collaborating with the greater world.
Curriculum
Days 1-4
What are the critical tools that we need for effective collaborative design? These tools involve, first and foremost – Collaborative Literacy – a mindset and a practical process – that enables people to work together for the common good. Beyond these soft skills is a set of hard skills and interdisciplinary technical knowledge that enables one to come up with creative and effective design.
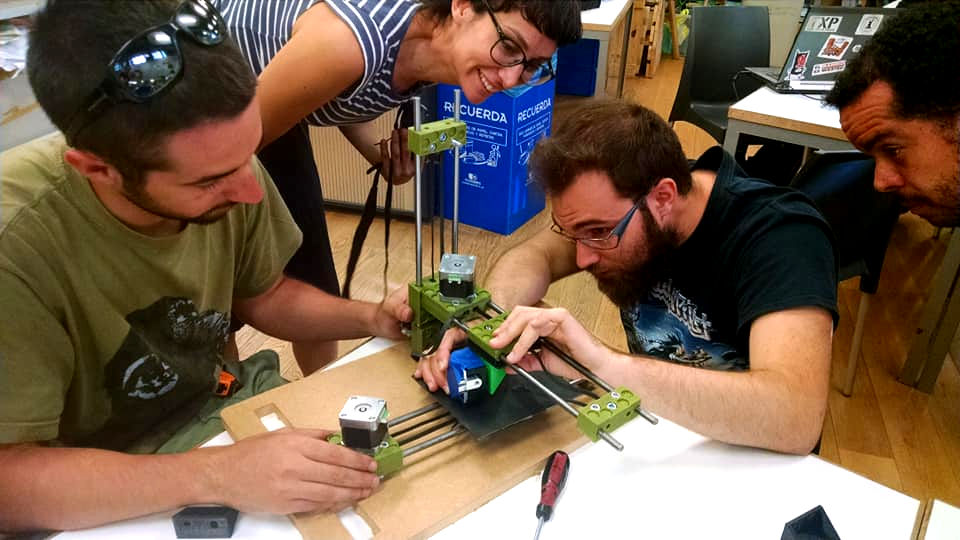
On the first day – we introduce Open Source Ecology’s collaborative design work and provide an overview of our vision and practical techniques that can get us there. We introduce our philosophy – which we believe has the potential to tranform the world’s economy from proprietary to collaboratve – with an accompanying cascade of positive change throughout the world. We dive immediately into practical tools of collaborative design – where each person builds a basic, rapid prototyping 3D printer from scratch, and runs a first print on the same day. The 3D Printer is called D3D Universal – a 3-axis machine with quick-connect tool heads – where we build additional tool heads on the second day.
On the second day, we dive into the design aspect – with a crash course on FreeCAD – an open source computer-aided design (CAD) tool. In one hour, we will teach you how to go from an idea in your head – to a basic design workflow – and end up with an object that you can print readily on your own 3D printer that you just built. From then on, you will do a number of simple designs in FreeCAD as you build your design skills. All the things you design will be practical tools like a razor, screw driver, tool holders, etc – that you then print and use through the rest of the program – and upload online so anyone can benefit from it or improve it.
The practical designs of the second day include a plotter pen holder and an electric motor holder. You can either print out existing designs that we have provided – or you can design your own or modify them. The pen holder turns your D3D Universal into a CNC pen plotter for drawing pictures or circuits – or a simple CNC mill/drill. You will learn how to control these machines with the same Universal Controller as the 3D printer – by uploading new software, generating control code by hand, or using software such as Inkscape, KiCad, or FreeCAD to generate tool paths for your plotter or mill. Because D3D Universal has a height sensor, you will learn how to level the workpiece automatically – whether you are plotting or milling.

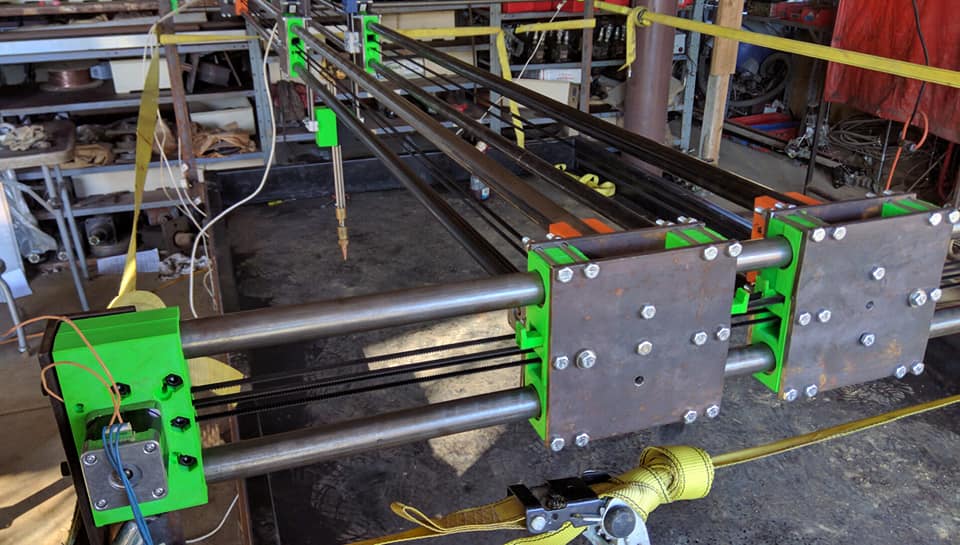
The intent of these exercises is to learn how these machines work, to the point that you can design and build a modified, larger, or more robust version that can be used in production. While the tools built are entry level and focused on education, they have a clear path of extensibility and scalability that allows them to become workhorse machines. With the tools and skills gained, and a support community to help – we encourage people to start open source microfactories that contributes to the local economy based on global, collaborative design. For example, we are including the design our our professional grade printer – D3D Pro – with the SD card that comes with the D3D Universal – so that you can bootstrap to professional grade production. You can print more parts with D3D Universal, and reuse most of its parts – to build D3D Pro. Same goes for scaling up from D3D Simple – to a larger CNC Torch table for producing metal parts – by printing the required parts for a much larger motion system. In fact, our build techniques can be applied readily to heavy machines which use a Universal Axis with 3″ steel rods.
On the third day we shift to electronics. We learn basic circuit design concepts – using analogies to mechanical and hydraulic circuits. We cover hands-on topics which culminate with the build of a cordless welder controller by an Arduino which we made ourselves. We will make 2 versions of a basic Arduino Uno compatible, starting from a bare microcontroller chip (Atmel 328) and supporting components. We will learn how to solder everything using a stripboard. Then we will use a second way: with the CNC drill that we made on Day 2, we will drill holes automatically using a toolpath made either by hand, or FreeCAD, or with Inkscape. We will then draw the connecting leads by hand – making the Art of STEAM happen – and etch the board with ecological etchant. In this process, we will learn what a microcontroller is – and how to design a working one from scratch. This is an exciting exercise because it shows basic techniques and produces a working product. Milling, circuit board design, microcontrollers, electrical components, toolpath generation, soldering, and etching are covered. For the etching part, we will 3d print a bath container, and agitate it by moving it back and forth on the D3D Universal print bed – to get a controlled etch result. If we have ambitious participants, we have an option of building in a bluetooth wireless module into the Arduino Uno circuit – so we can control the Arduino wirelessly using the Raspberry Pi/Beagle Bone Tablet/Film Studio that we build during the 5 project days.
On the fourth day, we delve into battery packs and power electronics. First, we will design and build simple battery packs, which are stackable for higher voltage or current. We will 3D print a power board with 3D printed screw-down terminals for making wire connections. While our Universal Controller is a simple example of a board for holding electronic components – the build on Day 4 will be used for 4 purposes: a small working welder (60-180A), AC light dimmer, DC motor controller, and charger. The focus here is learning about power electronics: how to use an Arduino to build a switching power supply that controls either outlet power or battery power for useful purposes. We will use the Arduino Uno that we built on Day 3 as the controller, to which we will upload the software for the four different functions. We will learn about control logic, how to write simple programs for Arduino, how to use feedback to control electonic devices, and how to measure voltage and current.
Days 5-9: Raspberry Pi/Beagle Bone Tablet and Film Studio
With all the tools and skills learned and built on the first 4 days, we will build a Raspberry Pi/Beagle Bone Tablet with a focus on use as a Film Studio for documentation, podcasting, and video production. Here our imagination can run wild with different approaches and options – and we will focus the team effort on building a practical product that is usable for web, email, video, photos, communications, and other productivity. Our special insterest is a suite of video tools for documentation and broadcasting. The idea is that we iterate on the design – after the STEAM Camp and in future STEAM Camps – until a marketable product is complete.
The basic package for the workshop revolves around a Raspberry Pi 4B quad core 1.5 ghz and 4GB RAM – a powerful base for a practical tablet. We are including a 7″ touch screen, Camera v2 8 megapixel module capable of 4000 pixel horizontal resolution (4K) to work with, and 30W LED light module that can act as a film light or a shop light. These parts are all included in the STEAM Camp admission. We are designing the system such that either a Raspberry Pi or a Beagle Bone can be used for the tablet.
From there, we will design or adapt and 3D print a case and battery pack – using the 18650 batteries from Day 4. We will focus on modular design – comparable to the promise of a modular electronic device like PhoneBloks. From the perspective of OSE – the value propositon is that the tablet becomes a lifetime design – where lifetime design can be achieved by open source modularity. Parts can be replaced, upgraded, modified, or added on.
While our main interest is a video production suite, we can suggest additional ideas such as a phone module to add phone functionality for about $40 (not included) or other infrastructure around the basic tablet:
- Tripod, Camera stabilizer, film/shop light module, or built in light
- Camera Slider or rotor – using the motor from Day 2 and 3D printed planetary geardowns, or a 3D Printed Linear Bearing, to make a practical camera slider of any length with a modular/stackable track. This would be a great exploration of mechatronics covering mechanical design, precision motion, geardowns, etc.
- Charger and larger auxiliary battery packs – for doing all-day time lapses or longer.
- Weatherproof or underwater case.
- Wireless microphone – for the film studio
- Wireless loudspeaker
- Wireless headphones
- Phone addition – perhaps using a Pi Zero for $5 with a phone module to create built-in phone
- Bluetooth keyboard
These are just some ideas. On the evening of the first day – we will have a discussion on which specific modules we would like to work on, and what extra parts may be needed. Only the parts mentioned above are included in the STEAM Camp cost (Pi 4B, touchscreen, camera, and LED light, and wiring) – which combined with 3D printing and other parts already available from the first 4 days – provide plenty to work on. We are also open to other ideas, and we will coordinate across all participants across all locations to maximize collaboration if anyone wants to purchase additional parts on their own. Assuming fast shipping such as Amazon, purchases would arrive by the Project Days.
Participants are encouraged to make specific suggestions for projects related to the Pi Tablet prior to the STEAM, so that additional parts may be secured if needed.
Learning Goals and Outcomes
As a result of the 9 day STEAM Camp, we expect that participants have an opportunity to gain:
- Solid proficiency in designing parts and assemblies in FreeCAD, the leading open source 3D computer-aided design (CAD) modeling application
- Fluency in a collaborative design process in which large projects are broken down into small parts, and many people collaborate on parts of the project by uploading design files and rapid prototyping using a 3D printer
- Fluency in a process of designing, 3D printing, prototyping, iterating, and documenting as a coordinated team towards designing practical products
- Ability to convert 3D designs into successful 3D prints by understanding printing parameters to genearate working printing files
- Ability to build a 3D printer and 3D printer extruder from scratch, and the ability to design different versions by using modular components
- Significant practice in working collaboratively as a team to solve relevant problems while teaching and learning from one another
- Understanding of the Universal Axis and Universal Controller system and how to apply it to building different CNC machines
- Basic proficiency in how to divide a project into small parts and how to allocate tasks to different team members in order to solve a design problem
- Understanding how to document a product design using public repositories or part libraries so that others can build upon the project effectively
- Understanding how to start and update part libraries of 3D CAD design with correct versioning for a large collaborative effort
- Ability to coordinate collaborative design work by using a work log, wikis, cloud editable documents, and FreeCAD for 3D design
- A basic understanding of how to approach a design problem starting with a concept, formulating requirements, doing technical design, and evaluating the result
- Basic understanding of how a microcontroller circuit works, and ability to design and build a basic microcontroller from a processor chip and discrete components
- Basic understanding of how a CNC circuit mill works, and the ability to build a circuit mill spindle starting from a motor
- Understanding how to generate toolpath files for plotting drawings and circuits, and for milling and drilling materials
- Ability to generate toolpath files manually by using basic g-code commands
- Basic understanding of a microcontroller-based switch mode power supply, with the ability to design and build a basic welder, charge controller, and AC or DC power supply circuit.
- Ability to design and build stackable battery packs that can be scaled in parallel or in series
- Basic proficiency in prototyping circuits using strip board, copper-clad boards, CNC hole drilling, cnc milling, and etching of copper clad boards
- Basic practice of soldering components to make circuits and basic practice of 3D printing boards to hold circuit components
- Basic understanding of how to design and build a computer tablet from a small microcomputer board, touch-sensitive LCD screen, including its battery pack and camera module.
- An improved appreciation of the potential of collaborative design to transform the economy from proprietary to collaborative
- Understanding how to upgrade and scale small Unviersal Axis-based CNC machines such as those built in this STEAM Camp to production-grade machines for the distributed economy
- Access to a community of individuals committed to open source product design and development
- Relationships and friendships with others who are interested in a livelihood based on open source microfactories fueled by open source design
- Ongoing collaboration with other STEAM Camp participants on projects dedicated to the common good
Daily Schedule
We focus on developing collaboration skills. The typical schedule involves 8 hours of programming:
- 8 AM – Breakfast
- 9 AM – Morning class time/design/planning/coordination.
- 10 AM – Morning build session.
- 1 PM – Lunch
- 2 PM – Afternoon build coordination
- 3 PM – Afternoon build session.
- 6 PM – Dinner and social time.
We understand that it is difficult for many people to make a 9 day commitment to the full Open Source Microfactory event. So we are offering a shorter, 1 or 2 day – on-site at the event location. It’s a crash course which allows you to benefit from some of the program highlights – without requiring you to commit to the full 9 days. You can sign up for either 1 or 2 days – January 25-26, 2020 – for either of the 2 North America locations. This allows you to get an introduction to the work of OSE – and then build a 3D printer that you can take home with you – in One Day! You will participate in the same program as all other people involved on the first day – a contagious day of information sharing and expansion of your perspectives – which WILL be a memorable experience. Plus, we will have a special evening post-hours track (7-9 PM) – where we teach you to design – with a crash course in FreeCAD. We can teach you to print the very first object that you have designed yourself – in only 1 hour from having no prior exprience in CAD. We use our streamlined workflow, which is sufficient for designs that can be as complex as you like. They key is understanding the basic concepts of the design process – which we will teach you. The cost is only $699 for this one day experience – including taking the 3D printer home with you – but it is limited to North America only at this time due to shipping of the kits.

But it gets better – you can participate for the second day (on Sunday) as well. This second day is a track parallel to and different than the main program outlined in the Learning Program section. While the main instructor on-site moves forward with the official program, a second instructor will guide the Day 2 of the Special Weekend Program. In the Special Weekend Program – we move into the collaborative design part. Using collaborative design protocols with FreeCAD, we all work on designing and building an upgrade for the D3D Universal – in One Day! This is intended to show the full power of collaborative design. You will work with other participants on designing and building a larger version of D3D Universal – the D3D Universal Mega – which has a 12″x12″ print bed size. And you will also get to take this larger machine home with you – by upgrading the D3D Universal that you built on Day 1 – to this larger machine. This is a one-of-a-kind opportunity!
For size comparison – D3D Universal Mega has a larger print area than the Ultimaker S5, almost twice the print area of the Prusa i3 MK3, and 4x the print area of the D3D Universal. To achieve this size, will add another Z axis to support a longer extruder axis, enlarge the base platform, and we will elongate the bed axis – to quadruple the print area from 6″x6″ to 12″x12″. This makes for quite a powerful printer – and is achievable simply with our scalable Universal Axis design. By doing this, you will practice not only collaborative design – but also – build the actual machine on the same day. You’ll get a feel for the power of collaboration using module-based design- and you will actually help us develop a new machine. While this is an experimental build in that we never built the 12″ version- we expect to produce a fully-functional workhorse machine. We have prior experience with building a 3D printer with a 1 square meter bed using the build techniques involved.
If you would like to stay for Day 2 of the Special Weekend Program – that is only $300 more if you would like the upgrade – and you also get to take the 4x larger print size machine home with you! If you would like to stay for Day 2 and if you just want to participate and help somebody else build their upgrade without you taking an upgrade home – then you are welcome to do this for free. The 4x larger machine allows for much larger prints, and your mind will be expanded regarding the possibilities of scalable modularity – and of working collaboratively to achieve results that you could not achieve on your own. You will observe how the same design and build techniques can apply to building much larger machines. To sign up for the Special Weekend Program – either 1 or 2 days – please use the Donate to OSE option in the Registration section below, and pay either $699 or $999 (shipping is included) to get your machine and to bring your new collaborative design skills back home with you. Enrollment for this option is limited, so please sign up today. The registration cutoff for this option is Thursday, January 16, at midnight – and once again – this is available only for the North America locations.
Our audience is people interested in collaborative design for a transparent and inclusive economy of abundance. We have no specific age limits, and we focus on mindset of learning. We welcome Women in STEAM, young people, retired people – and anyone who wants to hone their collaborative development skill set.
We are seeking individuals who want to build the world around them – based on open source principles – and this workshop is intended to provide inspiration and the tools to do so. We have a focus on understanding HOW to design – not just to build things – and applying our skills to make a more transparent and inclusive economy of abundance. We are looking especially for those people who want to get their hands dirty – as responsible technology can come only from involved citizens. To this end – we demystify the skills necessary to build robust and human-centric products – easily and at low cost.
If you are interested in starting an open source microfactory to bring wealth to your community – we provide you with the mindset and tool set that helps you to do this.

Marcin Jakubowski
Event facilitator for Dallas, Texas, USA
Marcin was trained as a fusion physicist. He left academia right after finishing his Ph.D. to start a farm – in Missouri – and founded Open Source Ecology. For the last 10 years, he has been working on the Global Village Construction Set – now 1/3 complete – a set of enabling tools and machines for building regenerative infrastructures. Marcin is passionate about creating the Open Source Economy – a new operating system for Earth. See Marcin’s bio and Global Village Construction Set Ted Talk:
Thomas Griffing
Event facilitator for Dallas, Texas, USA
Tom has a background in Electrical Engineering, Computer Science, Technical Writing and Hydraulics. He runs a small computer consulting business, instructs Tai Chi classes and also teaches “online” computer classes for a community college in Dallas. He has a farm in East Texas with a shop where he practices permaculture farming, works on projects of interest and sells Power Cube kits, parts and other items. He has also led OSE workshops on fabricating the Power Cube and Micro Power Cube. Tom Griffing is OSE’s Power Cube Lead and has been in Power Cube development since 2011.
Michel Dhoore
Event facilitator for Ghent, Belgium
Open source society proponent. Jack of all trades, master of some. Over the years working in several sectors from printing, stage building, as theater technician and as a entrepreneur / contractor mainly in ecological insulation – gives Michel a broad technical insight. Michel is not so keen on schooling but very keen about learning and education and he doesn’t confuse the two. The internet has given him and humanity as a whole a tool to learn and share at an unprecedented rate. The last few years he has been focusing on 3D web visualization as a learning tool by using solely Open Source software tool-chains. On his website 3dcontent.be you can find some of the results. His final goal is building all kinds of stuff, not only virtual, in a totally Open Source workshop. He has co-designed the Universal Axis, and is currently developing the open source, 3D printed, axial flux electric motor.
Chris Caswell
Event facilitator for Richmond, Virginia, USA
With a background in Computer Science, Chris became particularly interested in Open Source Hardware as he began to experiment with 3D Printing in 2011. He was inspired and driven by the vast potential of personal/distributed manufacturing as he witnessed the line between software and hardware begin to blur. In 2013 he quit his job in Boston and moved to Richmond, Virginia to work with the technology full time. This work eventually became a Full Service 3D Print Shop – 3D Central – specializing in desktop FDM printers. He primarily does custom fabrication and rapid prototyping, along with continuing to offer 3DP related services to the surrounding community. Over this time he has replicated over 10,000 things, and trained hundreds of folks on the basics of the technology.
This is our first ever event in 3 concurrent locations. The program is an all-day event for 9 straight days. You can register to attend in person at one of the 3 locations in Europe or America – there is a separate registration form for each event. Or, you can register for remote participation where we ship you the OSE Developer Kit so you can participate hands-on with the builds.
The working language for participant collaboration is English, as this is an international event.
Note that due to the time difference, we will coordinate with Europe first thing in the morning in America time each day. And once Europe’s day ends, we continue working in America – so it is a tag team effort. Eventually the STEAM Camps will be such that work is ongoing 24/7 through a tag-team on all continents.
Dallas, Texas (USA)
- Location: 1942 Co Rd 3513, Wills Point, TX 75169 – 1 hour east of Dallas. This is a location in the country and a permaculture site, with a workshop and ranch house. This location offers a little bit of a permaculture experience on top of the open source microfactory experience – with a site that grows some of its food, builds earthworks, keeps bees, and uses renewable energy.
- Nearest International Airport – Dallas/Fort Worth International Airport
- Accommodations: Accommodations for 6 or more people are available free of charge in the house. There are 6 rooms available with beds or cots, and one or two of the rooms have space for multiple cots or sleeping bags to be laid down. Otherwise, there are hotels 15 minutes away
- Food: Continental breakfast such as oatmeat, eggs, and cereal, and fruit is provided. We have a grill and kitchen available for use, and we may cater dinner a couple of times during the workshop. Otherwise, you can bring your own lunch or go to local restaurants 15 minutes away.
- Travel: We can offer an airport pickup to the site from Dallas/Fort Worth International Airport, so if you need a ride from the airport, please plan on arriving for a pickup at 8 PM from Dallas/Fort Worth International on January 24. We can also take you to the airport the day after, so please plan on traveling in the morning after the last day of the workshop. If you are driving, you are welcome to arrive on Friday if you are staying at our site, or just before the 9 AM start on Saturday.
Richmond, Virginia (USA)
- Location: 3D Central – full service 3d print shop, 1726 Altamont Ave Suite B, Richmond, VA 23230. Education and production space.
- Nearest International Airport – Richmond International Airport
- Accommodations: no accommodations are available on site, participants are responsible for their own accommodations
- Food: Not provided. Participants can go to any of a wide range of restaurants nearby or bring their own lunch.
- Travel: Participants are responsible for their own transportation to the site
Ghent, Beligium (Europe)
- Location: De Meubelfabriek Makerspace, Meibloemsstraat 18, 9000 Ghent, Belgium. This is a community space in the city.
- Nearest International Airport – Brussels National Airport (BRU)
- Accommodations: no accommodations are available on site, participants are responsible for their own accommodations
- Food: Not provided. Participants can go to any of a wide range of restaurants for lunch or bring their own food.
- Travel: : Participants are responsible for their own transportation to the site
What to pack
– Bring a cordless drill or soldering iron, if you have them.
– Bring safety glasses and gloves, if you have them.
Special Last Minute Discount: 2-for-1 offer – bring a friend with you for free (you take only one Microfactory Kit or 3D Printer home with you only). Applicable to Regular Registration and Special Weekend Program.
Registration Options
Early Bird Registration – $1499: Full on-site participation at one of the 3 locations. Includes the OSE Dev Kit (see details at the Microfactory Prototyping and Developer Kit section above). Offer valid until 11:59 PM CST USA time, Friday, Jan 3, 2020.- Regular Registration – $1699: Full on-site participation at one of the 3 locations. Includes the OSE Dev Kit (see details at the Microfactory Prototyping and Developer Kit section above). Note: registration cutoff for the on-site participation for all 3 locations is Thursday, Jan. 16, 2020 at 8 PM CST USA time.
- Remote Participation –
Early Bird $899Regular Registraion – $1265: Includes live access to the event over the internet for all the classroom, design, and build sessions – so you can collaborate with us in real-time. ALSO INCLUDES the full OSE Dev Kit – so you can participate in all the builds along with the live event. See detail of the Dev Kit at the Microfactory Prototyping and Developer Kit section above. Shipping is included within the USA – as it will depend on your location and how much shipping time is available before the event. Note: Remote participation available only for the USA locations, and cutoff for this remote participation is Thursday, Jan. 16, 2020 at 8 PM CST USA time. - Special Weekend Program – $699 (or $999): Participate for 1 or 2 days, and bring a 3D printer home with you. See details about the Special Weekend Program above.
- Donate to OSE – Sponsor another participant or Donate to OSE: We are a nonprofit organization with 501(c)3 status, and you can make tax-deductible contributions to us. You can fund attendance of someone who is on the waiting list for financial assistance. We receive low-income assistance requests for all of our workshops. Sponsor by paying the quantity on the order form below. Please email us at info@opensourceecology.org that you are sponsoring someone else. We can send you a tax deduction receipt (US customers only). You can also donate via BitCoin:

Bitcoin Address: ”’166yC48RakrZdtsBj36vY9q29CpzknHbxY”’
Payment Options: PayPal, Check, eCheck Bitcoin, Money Order, or Wire Transfer
To register, we use Eventzilla (below) – which accepts PayPal or eCheck options. Using the eCheck option (bank routing + account number) avoids the 3% PayPal fee. To avoid fees, you can send a check to Open Source Ecology, 909 SW Willow Rd, Maysville, MO 64469. We can also accept Bitcoin and and wire transfers. Email us at info at opensourceecology.org for additional instructions.
All sales are final, as we are making significant material purchases and incurring logistics expenses in preparation for this camp. In case of the unlikely events such as weather or civil unrest, we plan to postpone the event until a more favorable date.
After registering below, please contact info-at-opensourceecology-dot-org to let us know which event you’d like to attend (Dallas, Texas / Richmond, Virginia / Ghent, Belgium)
Have questions? Drop us an email: info-at-opensourceecology-dot-org
What preparations should I make prior to attending the live event? Make sure that you have a working laptop with mouse and internet connection. Make sure that your computer can run OSE Linux v1.0 – the software suite of FreeCAD, Lulzbot Cura, Arduino Environment, KiCad, Inkscape, etc – either by downloading the software or requesting a copy of the Live USB, which we can ship to you (it’s included). More information on this is found in our logistics email that is sent soon after your register.
What are the technical requirements for participating on site? You will need a working laptop with mouse and wireless internet connection. For software requirements – you will need to run OSE Linux. You can either download OSE Linux v1.0 and make a live USB – or wait until you receive your Dev Kit, about a week before the STEAM Camp. The Dev Kit includes a copy of OSE Linux v1.0. kit, so you should make sure prior to the event that you can run the OSE Linux. We strongly recommend that you test OSE Linux v1.0 before the event – as we simply will not have time to troubleshoot software issues related to OSE Linux during the event. If you are not able to run the necessary software, your experience will be limited.
What are the technical requirements for participating remotely? You need to have a decent internet connection, as we will be streaming video from the live event. A webcam is useful so we can see you. For software requirements – you can either download OSE Linux v1.0 and make a live USB – or wait until you receive your Dev Kit, about a week before the STEAM Camp. The Dev Kit includes a copy of OSE Linux v1.0. kit, so you should make sure prior to the event that you can run the OSE Linux. We strongly recommend that you test OSE Linux v1.0 before the event – as we simply will not have time to troubleshoot software issues related to OSE Linux during the event. If you are not able to run the necessary software, your experience will be limited.
I am participating remotely. I have a moderately equipped shop, but have minimal metal working tools. What items should I acquire/borrow prior to the workshop? I.e., angle grinder, wire wheel, torch, drill press etc.? Our kit is largely self-contained, so that access to tools is not a block in our builds and experiments. We have designed our kit specifically so that includes the necessary hand tools, and so we 3D print or build out any other tools that we need. This is a unique part of the immersive open source microfactory experience. If you have a vise, hammer, cordless drill with drill bits – that can help but is not absolutely necessary.
Given that some nuance is lost in not being physically on site, will a remote participant still get the fullest experience they’d need? Regarding the remote participation – with the kit that we ship your expected learnings would be building the printer, plotter, learning FreeCAD, building out the remaining experiments and tablet. If your internet connection is decent, then you can follow the experiments and materials pretty well. The iterative upload-download to part libraries should enable a larger team to follow on site or remotely. What you will probably miss is the face-to-face relationship building and potential friendships that you probably can’t establish without interacting with people more directly. There will be that social time and relationship time that can happen only spontaneously or in person. If you are looking to meet people and do potential collaborations as a result – then on-site naturally would be better. The other part is that if you cannot do something, or if something breaks nobody can step in and give you a hand or give you a replacement part, and given that the curriculum is pretty packed – you might miss finishing some things if you are not able to manage them yourself. The big part about the onsite participation is the synergy and back-and-forth between people – simply helping each other – and the synergy of some of the projects. Some of the projects are designed to show metaphorically – and practically – that we can do more together – as emphasized by our modularity. Specifically – the welder experiment is designed such that we are stacking multiple battery packs together – in order to make a working welder. The battery pack that each person receives in their kit is not sufficient to power a welder – so we will need at least 3 participants’ battery packs to combine to the minimum welding amperage needed – and more for higher power. The welder experiment is the only one that you can’t do directly – but of course you can watch as we do it on site. In general, all the other experiments don’t require such stacking. But we wanted to design the welder experiment as we did – in part due to material costs, and in part to show the power of modular, scalable design – for transcending the material cost limitations.

Comments are closed, but trackbacks and pingbacks are open.