Build Yourself. Build Your World.
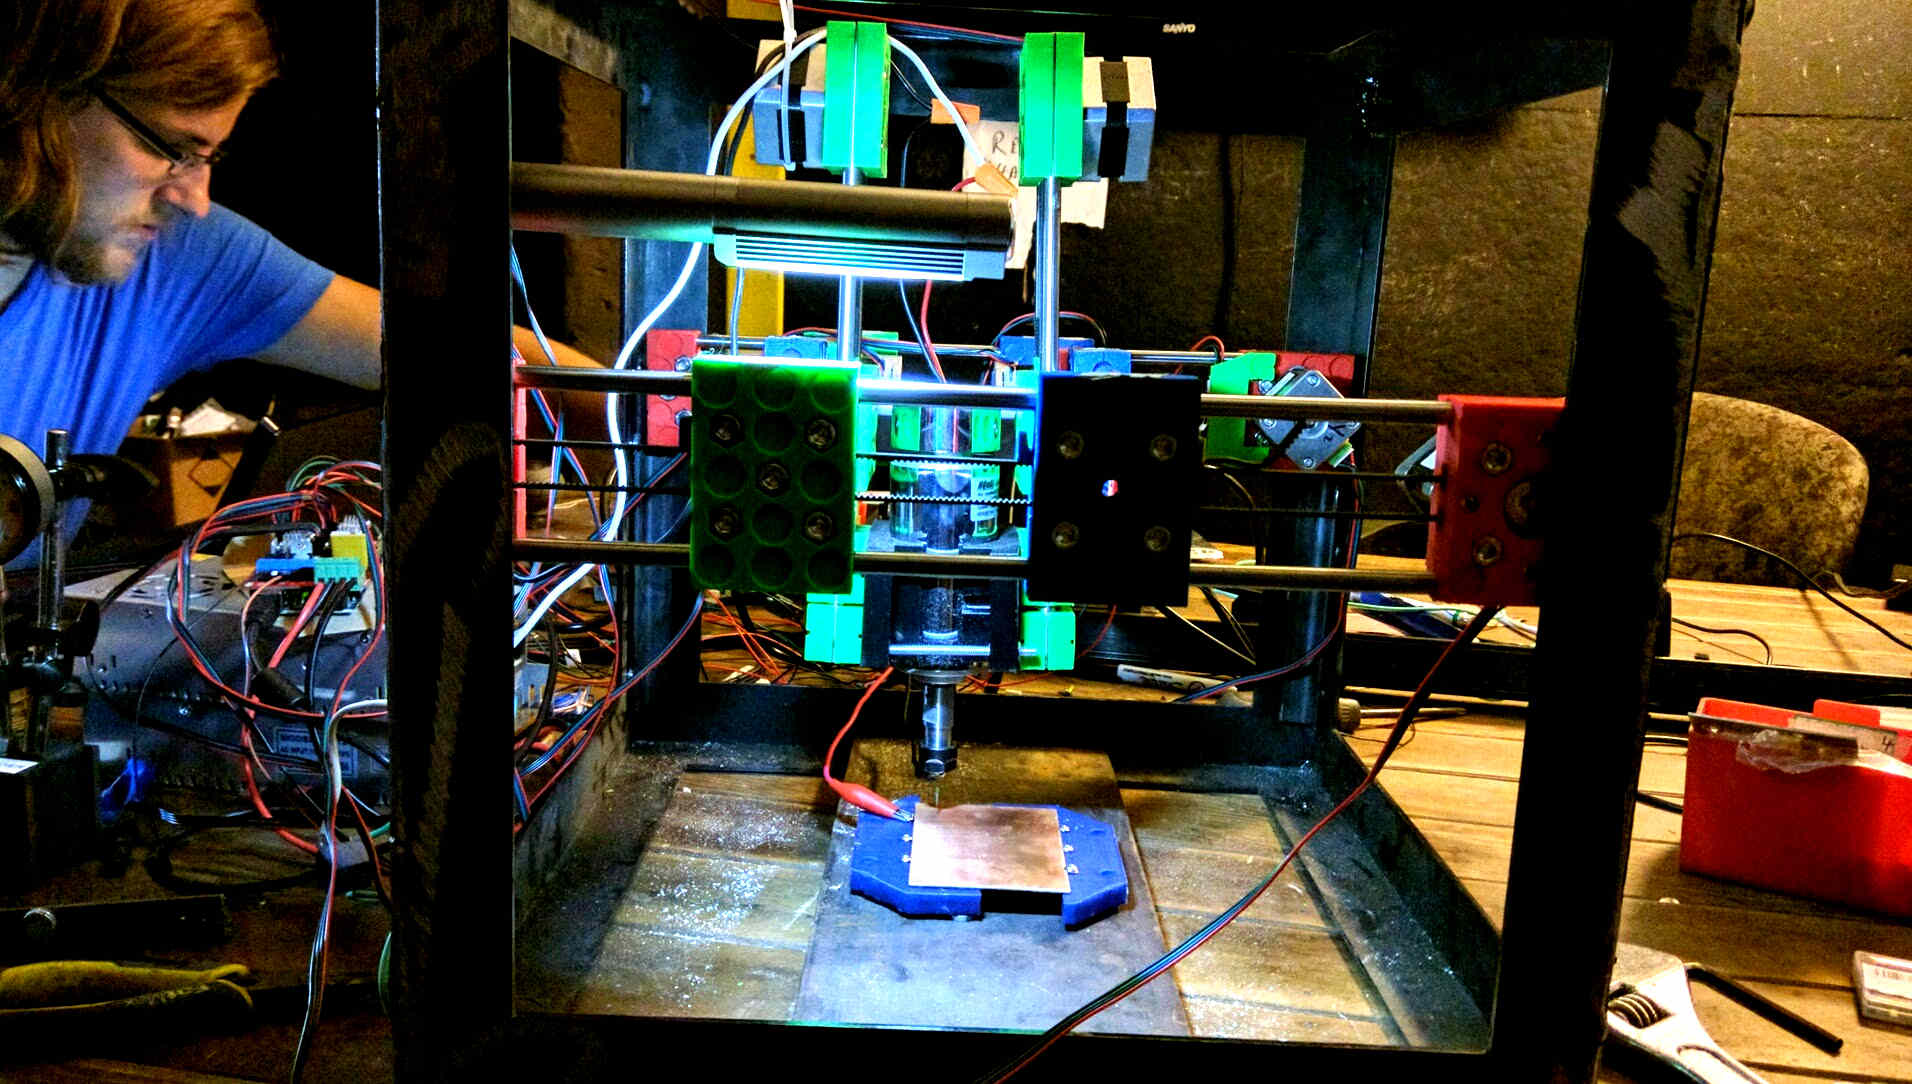
Join a workshop with Marcin Jakubowski (Global Village Construction Set) and Shane Oberloier (Open Circuit Institute, Michigan Technical University) where you will build and calibrate an open source CNC Circuit Mill in one day, while also learning about circuits, circuit design, and how to generate circuit milling files – using a 100% pure open source tool-chain. This is a 3 day workshop where you build the circuit mill from scratch – and get immersed in a world of applied electronics from design and build of the circuit mill to the milling of circuits. You will also have an option to take a full CNC Circuit Mill parts kit home with you, which you can assemble at home.
This course aims to provide the most immersive and comprehensive deep dive into electronics – a course we only wish we could have taken in school.
This workshop is a deep immersion into all the steps that allow you to understand open source circuit production and the types of electronics that go into the Global Village Construction Set (GVCS). This includes functions of basic circuit components – to the point of designing common circuits – using a widely-used part library of electronics components defined by the Open Circuit Institute. We will build an open source 5 kHz Arduino oscilloscope – a key electronics diagnostic device – to see what is actually happening within circuit wires. We will also build other sample, small power electronics circuits – relevant to the GVCS welder, induction furnace, inverter, laser cutter, plasma cutter, and off-grid power. We will build a usable car 12V DC battery inverter for powering a laptop or charging a phone while on the road – as a small example of a practical product that can be made with the D3D CNC Circuit Mill – and a D3D 3D Printer.
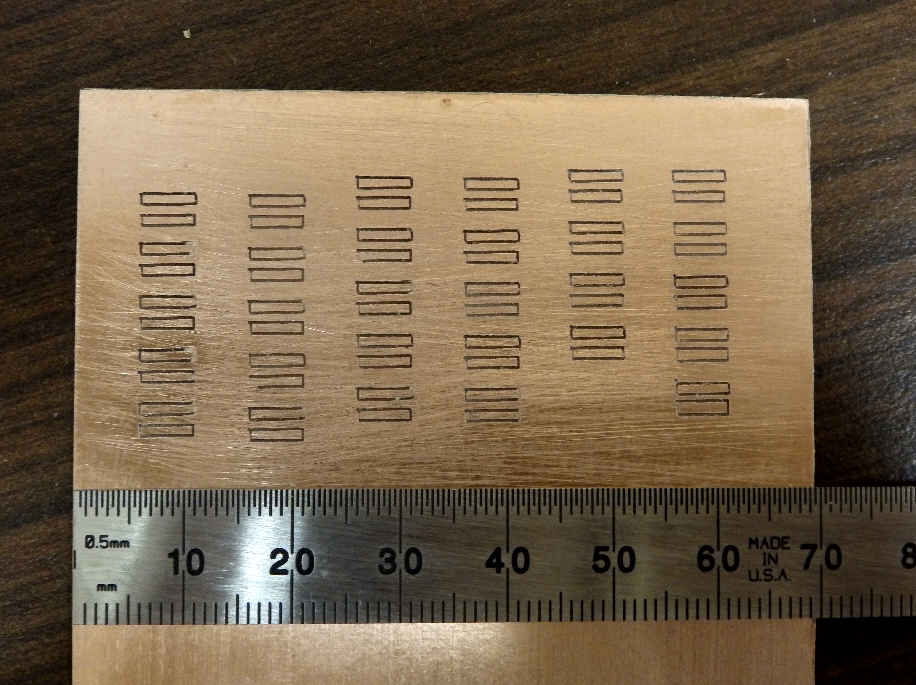
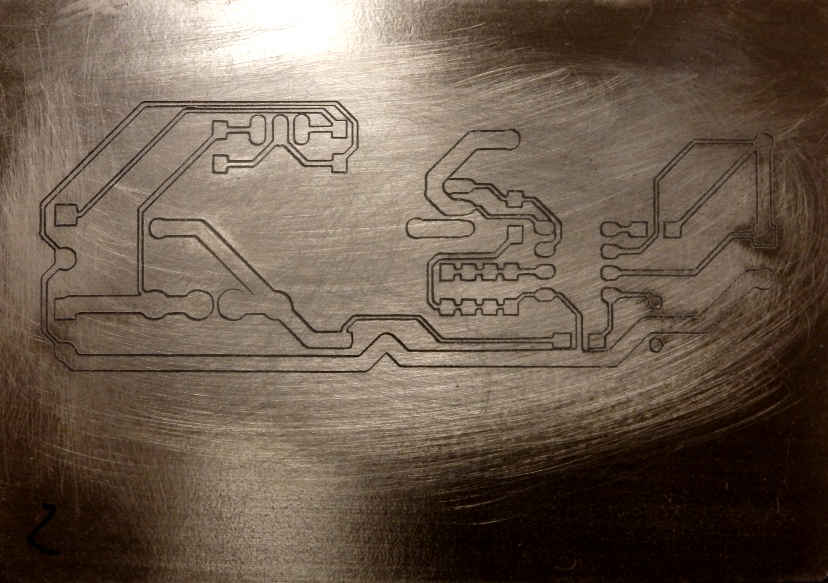
Figure: Cuts of the circuit mill are < 0.5 mm wide, and circuit paths of 1/2 mm can be obtained reliably.
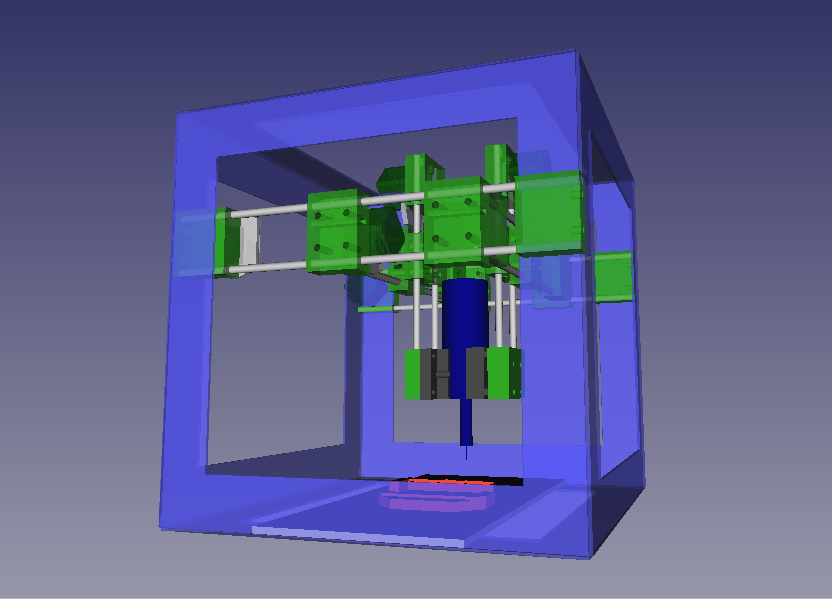
See more information on the circuit mill on the wiki. Specifications are:
- Steel frame (robust for 3D printing and other applications)
- Drive: GT2 Belt driven, 10 micron resolution. Dual X, Y, and Z axes with 72 oz in NEMA 17 stepper motors
- Backlash: 0.13 mm (x,y); 0.05 mm(z); backlash is software-corrected
- Feature size: capable of milling 1/2 mm wide traces
- Working area: 140 mm x 200 mm
- Magnetically mounted milling surface plate for mounting circuit boards
- 100W Spindle – 15,000 rpm
- RAMPS control board running Marlin motion firmware
- Software – Copper Carve open source control interface with bed probing for auto leveling of circuit board
- Universal Axis universal motion system
- Materials cost – $500
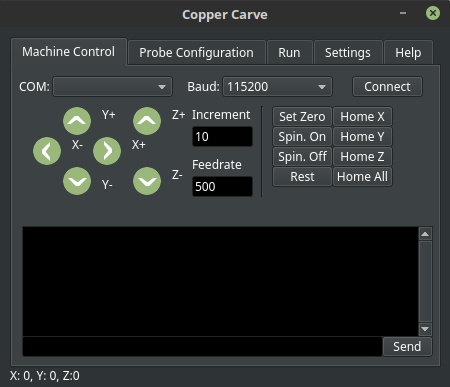
Figure: controller interface for the CNC circuit mill.
We will build the entire circuit mill from scratch, including welding a metal frame. A metal frame can be welded or epoxied together. Then we run the mill:

Test the backlash:

Do automatic bed leveling:
Day 1 – Friday, July 6, 2018
- 9:00AM-10:00AM – OSE + OCI intro + People Intros
- 10:00AM-10:30AM – What is a circuit board, and how are they manufactured (http://www.voltfolio.com/main/content/notes-circuit-board-construction) Overview of the Circuit Mill and its Design Rationale.
- 10:30AM-4:00PM – Construction of Circuit Mill. Provide time for “teachable moments” like failure modes, AC wiring, Firmware uploading, etc. Lunch in between.
- 4:00PM-5:00PM – Initial Calibration & Characterization. Teaching that the design process includes debugging.
- 5:00PM-6:00PM – Overview of composition of an electronic device: power supply, controller , connectors, components, case, etc. Types of signals.
- 6:00PM-7:00PM – How to start your design. The design process and design workflow behind an electronic device. Where to find the resources for and how to start communicating an idea that you want to make. Breaking down an electronic device into parts to understand it. Reading data sheets. Identify what you need to learn.
- 7:00PM-8:00PM – A more in depth look at the types of fundamental components and building blocks of electronic circuits and their functions. Overview of OCI Part Library and how a small number of parts can provide different functions of a circuit.
- 8:00PM-9:00PM – A more in depth look at power supplies for practical machines – their types, and their basic architecture. How they apply to welders, lasers, plasma cutters, induction furnaces, and off grid power. Linear vs switch mode power supplies.
Day 2 – Saturday, July 7, 2018
- 9:00AM-9:30AM – Review of last day.
- 9:30 AM-12:00PM – Calibrate Mill. Analyze and critique build results. Selecting milling and drilling bits. Cutting sample designs. Throughout the rest of the workshop – continue cutting designs to further calibrate accuracy.
- 12:30PM-2:00PM – Signals and Sensors: a detailed look. Filtering, amplifying, converting. Introducing analog, digital, serial, and PWM signals. Discussion of sensors and what types of signals they generate. Internet of Things sensors. Choosing one sensor vs another. How to read signals with an Arduino. Noise and what it does to a signal, and how to get rid of it.
- 2:00PM-4:00PM – A more in depth look at controllers. What they are, how to make them do what you want. How to interface them with your circuit. We will take a micro-controller chip and discuss how you can make an Arduino out of it. A microcontroller vs computer controller: how many Arduinos are inside your computer? Memory, arithmetic, input/output.
- 5:00PM-6:00PM – KiCAD – Schematic Designs – the symbolic representation of a circuit.. Open source toolchain to generate circuit design, and to produce them. Using part libraries: emphasizing
- 6:00PM-7:00PM – KiCAD – PCB Designs – the physical layout of a circuit..
- 7:30PM-9:00PM – Why and how to measure voltage and current. An oscilloscope allows you to visually understand what is going on inside wires. It allows you to troubleshoot, visualize, and understand what goes on in a circuit. They are used primarily for time-varying signals. Oscilloscope vs. multimeter. Did you know that you could use Arduino to build a simple yet highly functional oscilloscope? Guided design and build of an Arduino Oscilloscope with signal conditioning. We will use 2 common platforms: Arduino and the Processing Programming Environment for visual artists. Using a simple Processing Program, we will display the oscilloscope output on a computer, while taking data with the Arduino.
Day 3 – Sunday, July 8, 2018
- 9:00AM-9:30 AM – Review of last day.
- 9:30-11:00AM – Present and refine ideas for a build of a functional power electronic circuit. One prepared option is a Power Supply – Boost switch mode power supply DC to higher DC, or Buck power supply from DC to lower DC, or car power inverter. We will choose from a number of prepared circuits, or if you feel confident, you can do your own design.
- 11:00AM-2:00PM – Proper Soldering & design validation. Using boards cut form the mill – design validation is once you have a circuit – and mill it out – and solder it – you test the circuit step by step as you build it (populate it) to validate a circuit.
- 2:00PM-7:00PM – Guided individual or group design and build exercise with full open source toolchain. Sourcing parts. Allowing for “teachable moments” & issues that everyone may face. Producing working circuits.
- 7:00PM-8:00PM – Presentations and design review. Casually present & talk about designs. Here is where we, as instructors, validate if we’ve achieved our educational objective.
- 8:00PM-9:00PM – Recap of Everything. Q&A.
Open Source Ecology has a much larger vision. See Marcin’s TED Talk:
This year, we are starting an immersion program so that we can accept many new developers – who can work with OSE full time. Hear more about the Immersion Training Program. The Open Source Microfactory Boot Camp is the first week of the OSE 5 Week Immersion Training Program:
The CNC Circtuit Mill is part of a larger narrative of the Open Source Microfactory:
3D printing, circuit milling, and laser cutting – and open source micro-manufacturing – in their infancy, have great potential for distributing production. We start with a 3D printer, so we can set up an online printing service for producing parts. In order to expand our enterprise – and enable the printing of large objects at low cost – we diversify into producing 3D printing filament from scrap plastic. We grind down scrap plastic, extrude it into 3D printing filament with our filament maker, and then wind it onto spools with the filament winder. Produced at a cost of only 10 cents per lb – we have inexpensive 3D printing filament that is almost free. So we can run an online 3D printing service successfully.
Can we then develop high value products that are competitive with standard consumer goods? That is our goal. So we collaborate on the Open Source Everything Store, where we design a whole catalog of products that compete with Amazon and Walmart – but are designed and produced locally. Household consumer goods total a $20T global market – so the pie is large and there is plenty of room for collaboration. It turns out that with 3D printing, a CNC Circuit Mill, and a small laser cutter/engraver – and a bunch of readily available, off-the-shelf parts – we can produce a whole range of useful products, and thus begin to effect manufacturing in a substantial way.
We are excited, and want to spread the word. So we run public workshops teaching people to build these machines, and how to design products that can be made with these machines – using a completely open source toolchain. We take this to our local libraries, schools, events – and involve thousands of people in collaborative product design. We teach people about massive parallel swarm-based development techniques – and every child and grandmother begin designing their own products and publishing the plans on the internet for free. The depth of local manufacturing increases – and people begin making more of the parts that would normally be purchased – such as motors and power supplies. We democratize the face of manufacturing – converting consumers to producers…
That is the narrative we’d like to see happen, and the 1 week OSE Boot Camp is an introduction to how to do this in practice. We will learn to design and use the open source Level 1 Microfactory, consisting of important desktop manufacturing tools. These tools are: a 3D printer, CNC Circuit Mill, Laser Cutter, and Filament maker. Participants will build a 3D printer to take home with them.
Some may say that this is already happening – but 3D printing and distributed manufacturing has not taken much of a hold in terms of replacing consumer goods. The key is high quality, proven designs – not fringe items on 3D printing websites that in many cases cannot even be printed. The key is engaging enough cooperation – that all the possible products truly become best-in-class – while remaining fully open source. We not only show you that this new mindset is possible – but how to build the actual production tools – and how to leverage massive collaborative development processes – so that we democratize product development on the face of this earth.
Perhaps the greatest single impact is environmental – as people learn to build their products – they also know how to fix them – thereby putting an end to the throw-away society – with lifetime design that can be modified, improved, or recycled back into feed-stocks. Our aim in the OSE Boot Camp is to introduce people to the first steps in seizing democratic control of production.
Have questions? Drop us an email: info at opensourceecology dot org

- Marcin Jakubowski – Marcin was trained as a fusion physicist. He left academia right after finishing his Ph.D. to start a farm – in Missouri. For the last 7 years, he has been working on the Global Village Construction Set – a set of enabling tools and machines for building regenerative infrastructures. Marcin is passionate about creating the Open Source Economy – a new operating system for Earth. See Marcin’s bio.

- Shane Oberloier – Shane is a Ph.D Student and Instructor at Michigan Technological University, researching open source tool-chains for low cost metal 3D printing. He has 4 years of experience in industrial automation and data-acquisition, working at Wineman Technology Inc. He has also worked for Interactive Aerial, designing electronics for UAVs. Shane’s primary interest is teaching and mentoring undergraduate students, where he works to emphasize practical abilities, efficient designs, and sustainable methods. In 2017 he was awarded the “Outstanding Graduate Student Teaching Award”. Shane is also working on launching Open Circuit Institute, a website made for sharing and building communities around DIY open source electronics.
Logistics and Food: Email us if you would like to bring a group. Workshop fee includes food. We have a barbecue grill and a kitchen available at HabLab, so feel free to bring ingredients as well. If you would like to stay in the HabLab, our shared room dormitory, this is included in the workshop fee. Wild camping is also available on site.
True Fans of OSE: As supporting members of OSE, True Fans who have been subscribed for 6 or more months receive a 25% discount on all of our workshops. This discount is only for the tuition part part of the registration fee, but not the 3D printer materials cost. Email us for details. You can sign up as a True Fan now to become eligible for the True Fans discount on future workshops.
Sponsor another participant or Donate to OSE: We are a nonprofit organization with 501(c)3 status, and you can make tax-deductible contributions to us. You can fund attendance of someone who is on the waiting list for financial assistance. We receive low-income assistance requests for all of our workshops. Sponsor by paying the quantity on the order form, or use the donate button below. Please email us at info@opensourceecology.org that you are sponsoring someone else. We can send you a tax deduction receipt.
Donate through PayPal:
Payment Options: eCheck, PayPal, Credit Card, Bitcoin, Check, Money Order, or Wire Transfer
To register, you can use PayPal or eCheck options. We prefer that you use the eCheck option (bank routing + account number) so we can avoid the 3% PayPal fee. We can also accept Bitcoin, checks, and wire transfers.

Comments are closed, but trackbacks and pingbacks are open.